How to Teach Kids to Use Glue: Fine Motor Practice from Squeezing to Color Matching
Learning to use a glue bottle takes more skill than it seems! Not a Lot, Just a Dot! gives young learners hands-on practice with glue control, hand-eye coordination, scissor skills, and color recognition through a simple activity that can grow with their developing skills.

This blog post may contain affiliate links. When you make a purchase through these links, I may earn a small commission, at no additional cost to you. I only recommend products that I genuinely believe can benefit you and your family! Your support helps maintain and improve all things A Pop of You. Thanks so much!
NOT A LOT, JUST A DOT: TEACHING KIDS HOW TO USE LIQUID GLUE
Learning how to use a glue bottle seems like a pretty simple skill, until you hand one to a preschooler.
Squeezing hard enough to get the glue out but gently enough to avoid a giant puddle takes control. Aiming the bottle at a specific spot requires hand-eye coordination. Picking up a small piece of paper and placing it on that dot requires precision. And knowing when to stop squeezing might be the biggest challenge of all.
These actions may seem small, but they’re exactly the kinds of movements young children need opportunities to practice as they develop the strength and coordination they’ll eventually use for cutting, drawing, writing, dressing themselves, and independently completing everyday learning activities.
That’s why I created Not a Lot, Just a Dot! Glue Practice. Instead of simply telling children to use less glue, this printable gives them a hands-on way to actually practice controlling the bottle while building other early learning skills at the same time.
And just like many of the activities I create, there’s more than one way to use it. The materials can stay simple while the skills you’re asking your child to practice change. For this activity, I like to think about those variations in three levels: Basic, Standard, and Advanced.

HOW TO USE NOT A LOT, JUST A DOT! GLUE PRACTICE
The basic activity is simple: place the tip of a liquid glue bottle on each dot, gently squeeze out a small amount of glue, and place a small paper square on top. But the way you prepare those paper squares, and which activity page you choose, allows you to change the challenge.
- At the Basic level, provide pre-cut paper pieces so your child can concentrate on controlling the glue bottle and placing each piece.
- At the Standard level, have your child cut their own paper pieces before gluing them onto the dots, adding scissor practice to the activity.
- At the Advanced level, use the colored-dot pages and have your child identify each color and match the correct paper piece to it.
Unlike some learning progressions, however, these levels aren’t meant to correspond to specific ages or even be completed in a strict order. The progression is about layering skills onto the activity based on what your child is ready to practice. Let’s break down what they’re actually learning at each level.

Learning Goal: I can squeeze a small dot of glue and place a paper square on top.
Start with the black-dot page and provide your child with small, pre-cut pieces of paper. At this level, the goal is simple: place the tip of the glue bottle on a black dot, gently squeeze out a small amount of glue, and place a paper piece on top.
It sounds incredibly basic, but there is a lot happening in that one little sequence. Squeezing the glue bottle works the muscles in the hand while requiring your child to control how much pressure they use. Positioning the bottle over each dot requires hand-eye coordination, and stopping the squeeze at the right moment requires motor control. Then your child has to pick up a small piece of paper, move it to the correct location, and place it directly onto the glue.
Squeeze. Stop. Pick up. Move. Place. Then repeat.
Fine motor skills develop through opportunities to actually use these small muscles and movements, which is why simple activities like this can be so valuable. Your child doesn’t need an elaborate fine motor setup. They need engaging reasons to use their hands in different ways over and over again.
And don’t worry about perfect dots. A giant blob of glue is part of learning how much pressure to use. Missing the dot helps your child practice aiming. Placing the paper halfway off the glue gives them another opportunity to adjust their movements. The finished page isn’t really the goal here. The practice is the point.

Learning Goal: I can cut paper pieces and glue them onto each dot.
When you’re ready to add another fine motor challenge, keep the same black-dot page but change one part of the setup. Instead of giving your child pre-cut pieces of paper, provide strips of paper and let them cut their own pieces before gluing them onto the dots.
Now we’re taking the same simple activity and extending the fine motor practice into another important skill: using scissors.
Cutting requires your child to coordinate the opening and closing movement of one hand while using the other hand to hold and stabilize the paper. Once they’ve cut a piece, they switch tools and use a completely different hand movement to squeeze the glue bottle. Then they use their fingers to pick up the small piece they’ve created and carefully position it on the glue.
That means one activity gives them repeated opportunities to cut, squeeze, pick up, and place, working their hands in several different ways without turning any one of those movements into an isolated exercise.
Paper strips are especially helpful for beginning cutters because children only need to make short snips across the paper rather than follow complicated lines or cut out specific shapes. If your child is still learning the opening-and-closing motion of scissors, this is also a great opportunity to use training scissors for additional support.
And their pieces absolutely do not need to look like perfect squares. A rectangle works. A triangle works. A tiny sliver of paper works. The shape isn’t the skill we’re practicing, cutting is.
I especially love this variation because the cutting has a purpose. Your child isn’t snipping paper just because you told them they need scissor practice. They’re creating the pieces they need to complete the next part of the activity. The fine motor practice is naturally built into something they’re trying to accomplish.

Learning Goal: I can identify colors and match them to the correct dots.
Once you want to add an early academic skill, switch to the colored-dot pages. One page practices the primary colors: red, yellow, and blue, while another focuses on the secondary colors: orange, green, and purple. Instead of placing any paper piece onto any dot, your child now has to look at the dot, identify its color, find a matching piece of paper, and place it in the correct location.
The glue skills haven’t changed. Your child is still controlling the bottle, squeezing a small amount, picking up paper, and carefully placing it. But now we’ve layered color recognition, visual discrimination, and matching on top of that fine motor practice.
As your child works, you can reinforce color vocabulary naturally through conversation. Ask what color they see, have them find a paper piece that matches, or hand them a colored piece and ask them to find where it belongs. If they don’t know a color yet, simply name it for them. “This one is yellow. Can you find another yellow dot?” The goal is to teach and practice, not quiz.
The primary and secondary color pages can also open the door to talking about how colors relate to one another. Once your child is familiar with the individual colors, you can begin pointing out that red and yellow make orange, yellow and blue make green, and blue and red make purple. That conversation can then carry over into painting and other hands-on color-mixing activities.
And remember, choosing the Advanced page doesn’t mean you have to add every other challenge too. A child who knows their colors but isn’t ready to cut independently can use pre-cut colored paper pieces. They’re still practicing glue control and color matching without the additional demand of scissors.
BASIC, STANDARD, AND ADVANCED AREN’T AGE LEVELS
This is where Not a Lot, Just a Dot! Glue Practice works a little differently from some of the other learning progressions I share. When we’re working with a concept like number bonds, skills build conceptually. Children first need opportunities to recognize numbers and quantities, then develop an understanding of how parts relate to a whole, and eventually apply that understanding to addition.
Fine motor skills and color recognition aren’t quite as linear.
A very young child may already recognize every primary and secondary color but still be learning how to control a glue bottle. Another child might be great with scissors but need more practice with color names. A child can be ready for the academic skill on the Advanced page while still developing the fine motor skill introduced at the Basic level.
That’s why Basic, Standard, and Advanced refer to the number of skills we’re layering into the activity, not the age or ability of the child completing it.
You can mix and match the levels based on what your child needs. Use pre-cut colored pieces to combine glue practice with color recognition. Have your child cut their own pieces but use the black-dot page when you want the focus to stay on fine motor skills. Or, when they’re ready for all three pieces, let them choose the correct colored paper, cut their own pieces, and match them to the corresponding dots.
The goal isn’t to move through the levels as quickly as possible. It’s to find the version that gives your child just enough challenge to practice the skills they’re currently developing.
MODELING HOW TO USE A GLUE BOTTLE
Before handing over the glue bottle, model what you want your child to do. I like using an I Do, We Do, You Doapproach when introducing new tools because independence comes much more easily when children have first had a chance to see and practice the process with support.
Start by demonstrating the entire sequence yourself. Place the tip of the glue bottle directly on a dot and narrate what you’re doing as you gently squeeze and stop: “Not a lot, just a dot!” Then pick up a piece of paper and place it on top.
Next, complete a few together. Your child might hold and squeeze the bottle while you help position it over the dot, or you might simply give a reminder to stop squeezing. As they begin to understand the movement and amount of pressure needed, gradually step back and let them complete more of the process independently.
Resist the urge to jump in every time a glue dot is too big or a piece of paper lands crooked. Those imperfect attempts give children information about how their movements affect the materials they’re using. With repeated practice, they’ll begin making those adjustments on their own.
Eventually, the goal is bigger than completing this particular printable. It’s being able to hand your child a bottle of glue during a craft or learning activity and know they understand how to use it independently.
WHY SIMPLE FINE MOTOR ACTIVITIES MATTER
Fine motor development doesn’t only happen when children are holding pencils.
Young children strengthen and coordinate the small muscles in their hands through squeezing, pinching, grasping, cutting, peeling, building, threading, picking up small objects, opening containers, and using tools. Those individual experiences begin working together to support more complex tasks as children grow.
That’s why I love activities that practice these movements through something meaningful instead of in isolation.
We’re not squeezing something simply because we need to work on hand strength. We’re squeezing a glue bottle because we need glue. We’re not picking up tiny pieces of paper just to practice precise finger movements. We’re picking them up because they need to go somewhere. We’re not cutting endless strips because we need to check “scissor practice” off the list. We’re cutting pieces we’re about to use.
The learning is built into the doing.
And as those small skills become easier, children can take on more of the process themselves. Instead of needing an adult to cut every piece, control every bottle, or prepare every material, they begin gaining the skills to independently create, learn, and problem-solve.

Keep the Number Learning Going
If your child needs additional practice at the Recognize level, Cardboard Box Roll and Cover is a great way to reinforce number recognition, counting, one-to-one correspondence, and connecting quantities to numerals. Children roll a giant cardboard die, count the dots on the side it lands on, and then find and cover the matching written numeral on a large number mat with a sticky note. Each roll gives children another opportunity to move from a visual quantity to a written number. They see the dots, count how many there are, and connect that amount to the numeral that represents it. Strengthening that foundational connection makes it easier for children to work with the written numbers they encounter in number bonds later.

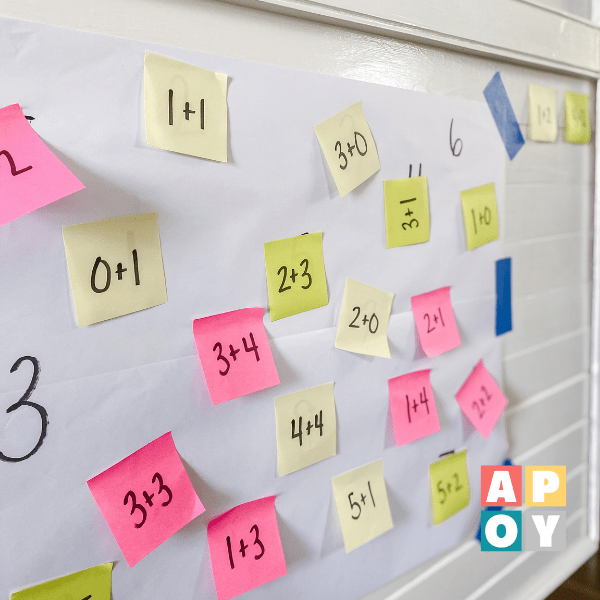
Once your child is ready to build on the skills practiced through number bonds, continue the progression with Sticky Note Addition. This activity moves children further into the Apply level by transitioning from the visual support of number bonds to solving written addition equations. Write different addition equations on sticky notes and scatter them around the house for your child to find. As they collect each one, they solve the equation and match the sticky note to the corresponding sum on a large piece of paper. Children get repeated practice with addition facts, fact fluency, number relationships, and flexible thinking, including seeing how different equations can result in the same sum. It’s a natural next step because the mathematical idea hasn’t changed. They’re still working with two parts that combine to make a whole. The representation has simply become more abstract.
SMALL SKILLS BUILD BIG INDEPENDENCE
It’s easy to look at learning how to squeeze a dot of glue and think it isn’t a particularly important skill. But early learning is full of tiny skills that eventually make much bigger things possible.
Knowing how hard to squeeze. Knowing when to stop. Coordinating your eyes and hands. Picking up something small. Controlling scissors. Matching a color. Following a sequence. Using materials independently.
None of those skills develops because we explained it once. They develop through practice.
Not a Lot, Just a Dot! Glue Practice gives children an engaging way to get that practice while allowing you to adjust the activity to meet them exactly where they are. Start with squeezing and placing. Add cutting when they’re ready. Layer in color recognition when it makes sense.
Because sometimes the activity that looks the simplest on the surface is actually working on a whole lot underneath. Not a lot, just a dot, and a whole lot of learning along the way!



Hey There,
I’m Katelyn!

Hi, I’m Katelyn! Join me for creative, intentional family fun and practical home management tips! Parenting is hard, but I’ve got the tools to help you create a calmer, more intentional home!
BROWSE MY
TOY RECS
resourceS
SHOP LEARNING RESOURCES



Subscribe to the empty mug club

GET OUR DAILY TO-DOS FREE!
Plus, get the latest achievable learning activities, easy recipes, storage solutions, teacher-approved toy suggestions + exclusive discounts to Becoming You learning resources straight to your inbox!

About Katelyn Collier , MAT
Katelyn Collier is a former elementary school teacher turned homeschooling mom of three and the founder of A Pop of You. She’s passionate about helping families step away from the pressure of today’s fast-paced culture and create homes filled with presence, joy, and balance. Through her resources and podcast, she shares simple, practical tools to reclaim childhood and make family life feel lighter and more intentional.
Masters DEgree in elementary education
VOICE OF BECOMING UNPOPULAR, A PODCAST COMING SOON!
CREATOR OF BECOMING YOU, A KIDS’ LEARNING RESOURCE LINE


FIND MORE INSPIRATION
Even More Achievable Ideas